Washi by Numbers DIY series

What a AMAZING day yesterday was for Elephantshoe. We put on our party shoes and sprinkled some glitter, tossed the streamers for the launch of a brand new Elephantshoe! From every type of goodie in the online shoppe to a revamped blog with ideas and free downloads.

It's been many weeks of really hard work and both James and I have been beyond excited to share all our new ideas. We couldn't be happier to bring a new improved Eleshoe to you. 

Yesterday was also our DIY on theprettyblog and we celebrated by bringing you a cute DIY project that is a fresh take on the nostalgic "Paint by Number" concept. The first of our series, "Paint by Washi" - a must for all Japanese washi tape lovers. Simply follow the directions below to create your own poster of LOVE. 

STEP ONE : Put aside 5 Japenese washi tapes in the colours as per below. Use your own or purchase these from our new online shoppe here. 


ELEPHANTSHOE_PAINT_BY_WASHI_1.jpg

STEP TWO : Download our "Paint by Washi" PDF at the base of this post and print our page 2-3.


ELEPHANTSHOE_PAINT_BY_WASHI_2.jpg
ELEPHANTSHOE_PAINT_BY_WASHI_3.jpg

STEP THREE : Stick your washi tape over the letters and shapes on page 2. Make sure you match your colours to each number section. E.g. Pink washi tape to be stuck over all the shapes in section 1. Peach washi tape to be stuck over all the shapes in section 2. It's o.k if you go over the lines as you will be cutting these shapes out a little later. 

ELEPHANTSHOE_PAINT_BY_WASHI_4.jpg

STEP FOUR : Cut all your shapes on page 2 out using scissors or a kraft knife and ruler and set them aside.

ELEPHANTSHOE_PAINT_BY_WASHI_5.jpg

STEP FIVE : The colour puzzle begins, paste each shape and letter according to their number on the page 3 to create your poster.

ELEPHANTSHOE_PAINT_BY_WASHI_6.jpg
ELEPHANTSHOE_PAINT_BY_WASHI_7.jpg

It's the 1st of August, a new month and we have designed a brand new digital desktop calendar wallpaper for you. Our readers & prettyblog readers can download it for FREE by clicking here, simply add the wallpaper to your shopping bag, and follow the steps till you reach your checkout page.  Enter this discount code "NEW ELESHOE" in the space provided. Next download your calendar at no charge. 

Our friends over at Blackframe Photography have been helping us so so much throughout our entire new website process and we could not thank them enough. Thank you Andre and Maritsa for the for the awesome pics in this post and our website. 

Happy "Washi by Numbers", toast to the new month and great new things to come. 

Love Sam 

from the "Elephant factory"

{DOWNLOAD OUR "PAINT BY WASHI PDF HERE} 

POSTED_IN_DIGITAL_WALLPAPER&DIY.jpg

OUR Prettyblog DIY : Hooray for Spring

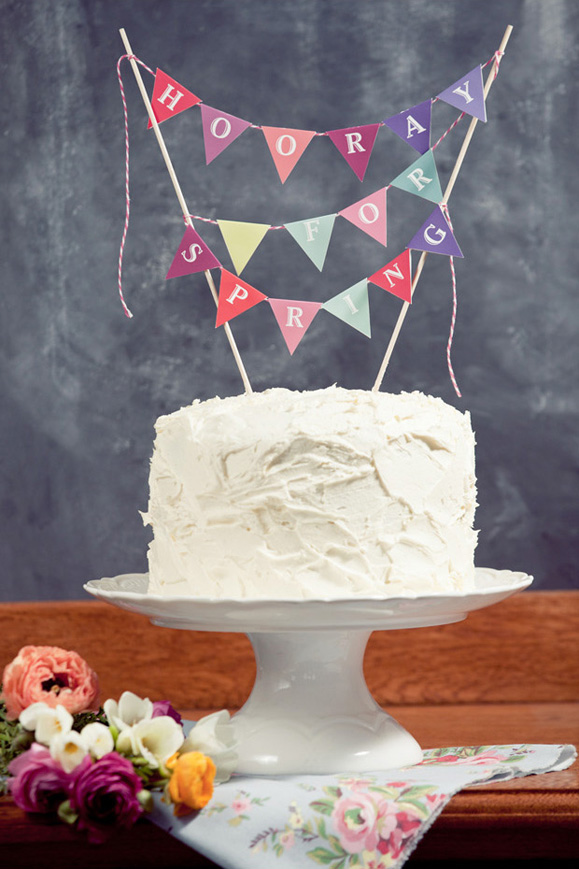
Take a look at our latest DIY on theprettyblog. It's  Spring day here in our beautiful South Africa. I can already hear the birds chirping, the sun is shining and it’s getting easier to wake up earlier each day. Hooray for Spring! If you feel the same about the arrival of this fresh and lovely season, celebrate by downloading our Cake Topper PDF and follow the easy directions below. You can even use our “Hooray” bunting for other projects like a baby shower,  kitchen tea, engagement or on your wedding cake. 

We recently showed the viewers of the Expresso Morning show on SABC3 how to make this versatile DIY. View the Cake Topper utube video tutorial to help you along.

If you are searching for a yummy cake recipe then go no further, here are a few featured on theprettyblog.

ELEPHANTSHOE_DIY_SPRING_CAKE_TOPPERS_02.jpg
ELEPHANTSHOE_DIY_SPRING_CAKE_TOPPERS_01.jpg

SHOPPING LIST 

  1. A  deliciously yummy cake, or you can make one of the recipes featured above.
  2. Thick card paper stock.
  3. 1 x craft knife, ruler & cutting mat.
  4. Paper straws or long wooden cocktail sticks.
  5. Twine. 
  6. Double sided tape.
ELEPHANTSHOE_DIY_SPRING_CAKE_TOPPERS_03.jpg

DIRECTIONS 

  1. Download and print page 2-4 of our sping cake toppers pdf.
  2. Cut the mini bunting with a craft knife & fold in half and open again, to create a crease.
  3. Attach a piece of double sided tape to the inside of the bunting triangle.
  4. Measure the length between the two straws or cocktail sticks, with a piece of twine, making sure there is a bit extra at each end so that you can wrap it around the straws or sticks.
  5. Peal the backside of the two-way tape and place the twine in the fold of the bunting triangle.
  6. Fold the pieces of bunting in half, making sure that the twine is secure at the top where the crease is. 
  7. Tie the twine to each of the straws or sticks, leaving a small bit to hang.
  8. Insert the straws or sticks into the cake.
ELEPHANTSHOE_DIY_SPRING_CAKE_TOPPERS_04.jpg

A BIG thank you to Andre from the incredible Blackframe Photography for popping by to our studio to photograph our DIY.  Please visit their blog to see more of their extraordinary wedding photography.

Happy cake & topper making!

love Sam x x x

from the “Elephant factory”

{DOWNLOAD PRINTABLE FILE HERE}


POSTED_IN_DIY_PROJECTS.jpg